Showing posts with label infant. Show all posts

Monday, December 9, 2013

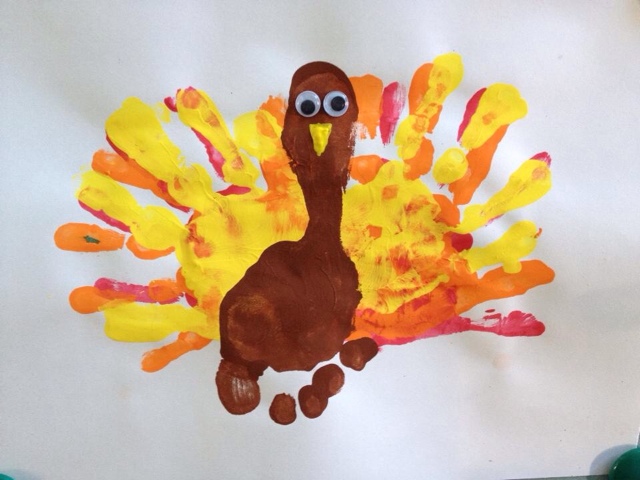
Hand & Foot Turkey

I had some time with my 4 year old, so we decided to make some Thanksgiving crafts to have on display when we hosted dinner.  This takes a bit depending on how long you wait to let the layers of paint dry, but turned out really cute!


Things you'll need:
 - red, orange, yellow,
   and brown paint
 - paintbrush
 - googley eyes
 - hands and feet!!


I thought it would be easiest to have the darkest color on the bottom so that it would show through the others as you put more prints on top, but you're welcome to switch it up however you would like to.  I do recommend waiting until the print is almost dry (or fully dry) before putting another print on top.  You'll see the progression photos around this post.  We tried to alternate the hands around a bit so they were not perfectly aligned.  I may actually recommend flipping the hands to the opposite side to completely get a different pattern.

After we let that dry, I coated her foot in brown paint and tried to make it so that the toes (feet) were below the hand feathers.  We added two google-y eyes after it dried and also a yellow beak.  You can add a beak cutting out a triangle from construction paper or I used the back of a paint brush to make a triangle with yellow paint.


Friday, October 28, 2011

Ghost Prints

Alexandria did this craft last year around Halloween at daycare, so I thought I'd recreate it since I thought it was really cute; plus this way I could see how much her foot has grown in a year!  We invited over our neighbor's son to make some ghosts too and they both had a really fun time.  This is an incredibly simple craft that takes next to no time at all.

Things you'll need:
 - Black paper (or orange also works)
 - White paint
 - Tiny google-y eyes
 - Paintbrush
 - Feet with Piggies!

As I said, it's pretty simple.  Paint your child's foot with the white paint; I think thicker you apply the paint, the better the result for this craft.  Stamp their foot on the paper wherever you'd like.  I end up cutting out around the feet so that it's smaller to display, but you could make a row of ghosts using both feet if you want to line the paper with them.  I had Alex do about 4 foot prints so that I could cut out a few of them separately to give as little Halloween mementos.  After the paint dries, add the google-y eyes to the ghost.  You can also add a comment bubble to the craft if you'd like to have it say, "BOO!" or add a little smiley face...and that's that!

I hope everyone has a safe and fun Halloween!!!

Wednesday, July 27, 2011

Butterfly Tootsies

Spur of the moment distraction idea for Alexandria was to make some butterflies in the morning before heading over to Grandma's house.  This was really quick and easy; also came out rather cute!!

Things you'll need:
 - paper
 - two or more different color paints
 - black marker
 - brush or anything to apply paint to feet!
 - tiny feet & fingerprints

First things first, grab a foot and paint the bottom.  You could get creative with this step and paint it various different colors so that the butterfly's wings are more colorful, but for today I stuck with a solid color.  Apply paint and stamp on the paper so that the footprints are on the opposite side than where they normally would be.  Wash, dry, repeat with opposite foot!  A trick I use is to always have Alexandria stand on the non-painted foot while I hold the foot with paint up in the air.  That way she has her weight on the other foot and I can more easily place the painted one onto the paper.

Final paint step (yes, I said this was easy!) is to grab a finger or two, dip them in paint and then have them create prints up the middle to make the butterfly's body.  A thumbprint works great for the head or you can just paint a larger circle with a finger like we did.

Wait for the paint to dry and then you can add the finishing touches.  Two dots for the eyes, a little smile and two antennae!  Quick, but cute butterfly memories!

Thursday, July 21, 2011

You're What Ties Our Family Together

For Father's Day, I helped the girls with a craft that we could give Daddy.  I used an idea that I got from my friend Beth's son's art work from his daycare that I saw (and photographed) while I was out visiting her.

Things you'll need:
 - any color paper you choose
 - paints
 - paint brushes (or anything to apply the paint to hand)
 - scissors
 - marker to write with


First up is to sketch the outline of a tie.  I just did this by eye (imperfection is the best part of home-made memories) and used the picture I took of the craft as a guideline.  Make it as big or as small as you'd like or as you need so that you can still fit a hand print or two (or more!) on the tie.  After you have the outline, use the scissors to cut it out. 

Next up are the hand prints.  You can do these whatever way you'd like; you just have to be mindful making sure they're positioned so that you'll be able to see a lot of each hand, ensure all will fit on the tie, and of the colors so that they will overlap and not disappear.  I picked purple and blue for the girls so that they'd both show up well.

Next is to add some finishing touches.  I added a 'DAD' to the tie knot, some edging to add some color to the cut out tie, and a super cute phrase 'You're what ties our family together'.  Here's the finished product amongst our very full refrigerator door!

Friday, May 20, 2011

Ocean Full of Fishies

I ended up LOVING this piece that we just finished and had to share pretty much immediately (after Alexandria was asleep of course) with everyone.  I got the idea from a website online for the fish and then just got creative while we were doing it to add in some other ocean pieces.

Things you'll need:
 - paintbrushes
 - variety of paint colors (green for seaweed, blue for bubbles, and whatever colors you'd like for your fish)
 - large sheet of paper
 - google-y eyes
 - permanent black marker
 - tiny hands :)

First, and of course the most difficult task, was to apply a variety of colors to Alexandria's hand before she made a fist and mushed them all together (which probably would have also looked neat)!  She was amazingly patient with this and held out her hand while I did the various stripes of colors.  One thing I tried to do was to make a larger part of her palm the same color so it could act as the fish face.  I made hers a little bigger than I would have liked, but it still turned out just fine.
Make the hand print facing either side of the paper.  I had it so her thumb was at the bottom of the sheet, but I don't think it would matter much if it was at the top since the fingers are representing the flowing fins.  Repeat as many times as you like or as many times as your child will let you re-apply paint!  We did two fish with each application of color and ended up with four cute little fishies.

At this point, I was kind of bummed and thinking about what else I could add when I thought about an ocean floor and using her fingers to make seaweed.  I painted only her four fingers with green paint (excluded her thumb), moved the bottom of the paper to the edge of the table and pressed her fingers all along the bottom.  I had to re-apply paint a few times, but I kept pressing until it was all off and then would go over it as necessary with newly paint covered fingers.
Again, I thought it needed something else on the left side.  I originally was going to fill it with a Mama fishy hand-print, but I opted for the easier task of letting her keep green paint on her hand a make a larger sea plant.  I added paint to the rest of her hand for this.  She went a little crazy smearing in the middle, so I added a print to top it off and like magic, we had a sea plant!

Next, I flipped the paper upside-down so that we wouldn't get in the wet paint and used her pointer finger to make blue fingerprint bubbles coming out of all of the fishies' mouths.
After it dried, I went back and added a half oval of sorts to make a head area on the fish and a cute half smile with the permanent marker.  Last, but not least I added a small google-y eye to the face.  You can see the face better in the first photo in the post.  There you have it!  Super cute fish and an ocean scene made all from my little girls hand!

Thursday, April 28, 2011

Lobster with Daddy

In an attempt to get some work done, I suggested my husband do a craft with Alexandria the other day since she really calms down while doing crafts even if they don't last that long.  I picked out a really cute lobster idea that I saw and set them on their way.

Things you'll need:
 - Red paint
 - Paintbrush
 - White paper
 - Black marker
 - Google-y eyes
 - Glue

First thing first was to do the hand prints that would act as the lobster claws.  Use the paint brush to apply paint to one hand at a time and make the print on the paper.  Alex really enjoys this part! :)
For your own sanity, be sure to wash each hand after the print has been made!  After that, apply paint to a foot (either foot will work, so whichever is easiest) and make that print so that the toes are at the bottom of the paper and the heel will act as the lobsters head.

Next step is to add the arms and legs to the lobster.  My husband just free handed these with the paintbrush.  The beauty of crafts at home is that imperfection is actually the greatest part of the craft; at least I think so!  (Not that my husband did any part not perfect :-P)  After everything is all connected, then you can glue on the google-y eyes at the top of the head (heal).  Last step is to add the antennae and smile using the black marker as the final touch!

Thursday, April 21, 2011

Hop Hop

In the spirit of Easter and having some extra time this morning with Alexandria before her Easter party at daycare, I decided to make a bunny using her feet as the ears to give to her teacher (and to keep one for at the house).  My neighbor gave me the idea when she sent me a similar craft picture the night before that her son had done at school and I thought it was so cute that I had to give it a try.

Things you'll need:
 - Pink paint & a paintbrush
 - Black marker
 - White paper
 - Tiny toes

The foot prints (one of each foot) will become the ears of the bunny, so you want to have them looking and angled the same as much as you can depending on the age and squirmy-ness of your child!  I held Alex on my lap and painted one foot.  I let her stand up on her non-painted foot and then pressed her painted foot down with my hand onto the white paper held vertically.  After washing that foot off in the sink, I repeated with the other foot.
And that's almost it!  After that, I made ears around the footprints and then drew in the face of the bunny.  My neighbor's son had cut out he bunny and glued it to another colored piece of paper to give it some extra color, but we were on a time crunch, so I just left it on the white piece of paper.  Any finishing touches will do and you have a quick and easy bunny rabbit with keepsake footprints in a matter of minutes!

Monday, February 14, 2011

Sharing a Little Love

My neighbor sent me a picture message with a 'not so crafty mama' craft and I decided to take a stab at it for myself.  In the end, I think her version came out better, but it's still capturing the memories that is the most important part of the craft.  I asked for her copyright permissions for the craft and to post!  (Thanks Marla!!!)
Things you'll need:
- Red paint & paintbrush
 - Pink paper (you'll need red paper and glue if you'd like to do layered hearts)
 - Pen
 - Tiny hands

The first thing you do is make a heart.  You can do this the traditional way by folding a piece of paper in half so that both sides are even, by tracing something that it heart shaped (possibly printing out a big heart on your computer to trace), or taking the really easy way out (as long as you have a Cricut) and just popping in a cartridge and having it cut out a perfect heart for your with a few button touches!  Regardless, as long as you have a heart, then you're good for this step.

I didn't take the time to create an 'inner' heart to give extra color or depth, but my neighbor did and I think her's looks sharper than how ours turned out.  After you glue the layers together (if you have them), you're ready for the hand prints.  I prefer to use the paintbrush to apply the paint to Alex's hands.  She's becoming much more interested in this process and spent a lot of the time playing with the bristles on the brush while I was covering her in red paint; very cute!

Right hand on the right, left on the left and you've completed your hand prints.  I had Alexandria do hers one on each side; Marla's however looks neat with the thumbs overlapping...to each is own!  Add a little personal message as a touch and your quick & simple valentines are done!  Alexandria left one of these on her changing table to surprised Daddy with in the morning and then gave one to her teacher at daycare.

Sunday, January 30, 2011

One Year Paw Prints

Alexandria thoughtfully (with some extra thought by Mama) got both my husband and I the same frame/kit for Christmas that we could use to make a keepsake for her first birthday.  She bought the BabyPrints - Photo and Baby Footprint Desktop Frame at Babysakes.com.  They have various versions of the same idea, but we thought it would be nice to have a picture with the print.  The frames come in all different sizes, colors and layouts so you can pick whichever you like the most.  We also chose to have my husband's be a footprint and mine be a hand print so we had one of each as a keepsake.

Things you'll need:
 - BabyPrints kit (or substitute using the suggestion in the note at the bottom of the post)
 - Baby for hands & feet
 - Aluminum foil
 - Hardcover book about 8 inches square (I used one of Alex's many board books)
The instructions were pretty good that came with the kit.  You cover a book with the aluminum foil so you have a non-sticky surface to roll the 'printing clay' on.  You knead the printing clay for a few minutes (make sure your hands are clean as any spec of dust/dirt shows on the white clay) and then roll it out on the board.  You might want to keep in mind while rolling what type of shape you'd like the print to end up on.  My rolling came out in circles / ovals, so I just rounded them up a bit after we did the print to make them more uniform.  You could also roll it so that it's more of a rectangle / square shape so you can make even edge trims after you do the print.  Whichever you choose, I would say I rolled it until it was about a 1/4 inch thick or maybe a little more.  There's really no science or trick to getting a level surface, but now that I think about it, I may have been able to press a book on top of it to level it off and make it even; might be worth a try!

As with others, my husband's help was needed for the foot print to hold Alex up over the print.  We did let her put a decent amount of weight on her foot once it was placed on the clay.  With the hand, I sat her on my lap and put her palm down on the clay first while I spread out her fingers and then smushed her hand into the clay. 
You then let the prints sit for a few hours and then flip them over based on the instructions so that the backs could dry.  Personally, I let them sit just the way they were for a day because when I tried to flip it over, some of the clay was sticking to the foil and I didn't want to ruin it.  I think we let them sit for about 4 days and I flipped them back so that the print was facing out after a day of the back facing out.  After it's dry, you assemble them in the frames and are done!  Now they provide double sided sticky tape for this which does NOT work, so I'd try to use something more permanent to stick the print to the matte they provide so that it stays on better.  Here's the final product!
Because the hand print was larger than would fit in the white matte frames they provided, you can see the brown piece in the print side of the frame that separates the glass from the print.  The white mattes they included in the kit covered some of the hand print edges, so I just didn't put them in.  I'm considering painting the brown piece white so that it contrasts better with the other side and doesn't look dingy!  After that, all I have to do is find an empty wall or table top on which to display them!

**NOTE: If you'd like to do this without buying a kit, I suggest using Crayola Model Magic as it is the same consistency and has the same drying effects as the 'printing clay' that came with the kit.  You'd just have to find a frame that you could use that had some depth on one side so that the hand/foot print would have room to fit behind the glass.

Tuesday, December 21, 2010

Hands & Feet Rudolph

When pondering what to get/make for Alexandria's teachers at daycare, I figured a cute little arts and crafts project would be perfect to give them along with a more traditional gift card.  I ran across the idea for this somewhere along my internet travels and wanted to give it a try.

Things you'll need:
 - Paint brushes
 - Brown paint
 - Google eyes (or you can draw them on) - I found a large bag at Walmart for $4
 - Red paint (or you can use a red puff ball...which I didn't have for this)
 - Sharpie or black marker
 - Piece(s) of paper
 - 2 hands and one foot :)

First things first, lay out all of the paper in a paint-proof environment.  This time I used the kitchen floor because I had the help of my husband to hold the stamper!  You pretty much just need the brown paint, a paintbrush, and the paper at this point.  I had my husband hold Alexandria's foot in the air while I painted the bottom brown.  (Of course you have to notice the toe curl from the tickle!)
From there, you use on hand positioned at the top of the heel mark to the left and the other to the right.  To be completely honest, I have no idea if it would look better with the thumbs in or out.
I pretty much just grabbed a hand, stamped it wherever it fell and proceeded down the line.  We made four, so it was an assembly line of paint, stamp, re-apply paint and stamp.  One hand at a time, obviously wash in between, and try to keep as tight of a hold as possible on the stamper!!!  My husband was definitely a huge help in this craft.  I will say that Alex does a lot better with the paint/stamp method now than she has in the past.  Here's a picture of the outcome after stamping.  As you can see, they all look different :)
After they dried, I added a little smirk/smile right above the toe line with the black permanent marker, added two google-eyes right where the heel part starts and a red circle nose.  Again, with the nose, I used paint and just applied it really thick so it would cover the brown, but I did see someone who used a red puff ball that also looked cute.  Here's the final product!  The teacher's loved them and we have one proudly displayed on our fridge :)
I hope everyone enjoys the project and has a happy holiday!!!

Saturday, November 20, 2010

Fall Bumpkins

Recently my girls and I went to a pottery painting store to make some Christmas/Birthday presents for Daddy.  While browsing the store's website to get some ideas before going (since I'm not so crafty!), I came across a plate with a pumpkin on it...a 'bum'pkin!!!  Now I thought this was beyond adorable and something I had to do (just not in public in the middle of a store)...and so it became our at home project.

Things you'll need:
- orange and green washable paint
- paint brush
- paper plate (unless your child will stay put long enough to paint their bum!)
- whatever you'd like to put the bum on - we used white construction paper
- a paint proof location and a tiny bum :)

First I poured some paint onto the paper plate and spread it around.  Unfortunately you can't tell in the picture how quickly I had to do this while Alexandria started unrolling the toilet paper!

Then I put the paper plate with paint on the floor next to 3 pieces of paper.  I'm not sure there's an 'art form' to getting this accomplished, but I sat her bum on the paper plate and smushed her down a bit.  After that I picked her up and plopped her back on the floor on top of a piece of paper.  You'll see in the pictures that the bottom of the bumpkin (near her legs) isn't quite as round it probably should have been.  My only resolution to this would be to hold your child between your arms with their legs up and get only bums to stamp on the paper.


Next we cleaned up because I'm not sure anyone wants their child running around with a wet paint orange bum while you're trying to draw on the stem!  The stem was simple; just a quick brush stroke and you're done.  BUMpkins!!!