Monday, January 27, 2014

Baby Food Turkey

Since I had a LOT of baby food jars coming in and out of my house, I was looking for a craft to keep the girls occupied over Thanksgiving and for a cute centerpiece for our table.  We ended up making a handprint turkey and I think it turned out really cute!

Things You'll Need:
 - Construction paper, pencil, & scissors
 - Baby Food Jar (washed and label removed)
 - Brown paint & a paint brush
 - Google-y eyes
 - Hands to trace

First we put the first coat of brown paint on the baby food jar.  No need to paint the 'top' of the jar since you'll never see it.  We did this and then let it dry while we made the hand prints.  I'd suggest a second coat so it has good coverage.

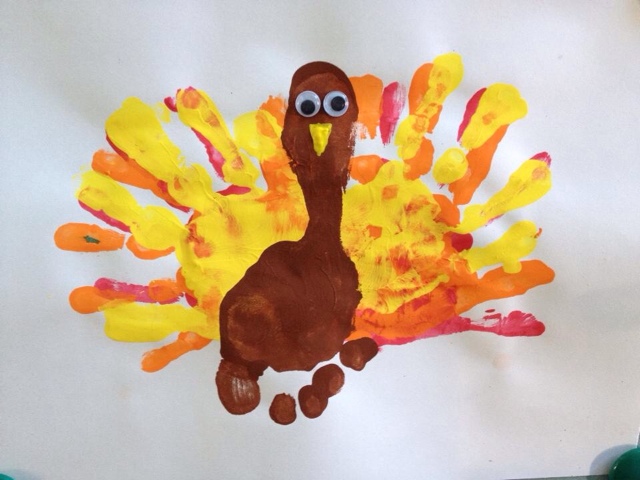
While waiting for it to dry, we traced my daughters hand on yellow, red, and orange construction paper.  Cut them out and then you can either tape, glue, or hot glue them together to create a fan look for tail feathers.  I found it worked well to flip the hands on either side so that the thumbs were at the bottom and you just sort of move the layers around so you can see all of the colors.  One thing to note is to make sure that the bottom goes straight across (don't angle so much that the thumbs are pointing down) or you will have problems with them bending or getting squashed when you put them on the jar. 

Once the jar is dried, you can glue the hand 'feathers' to the back of the jar and let it dry.  Next you can add the two google-y eyes and we just cut a small yellow triangle from the yellow construction paper for a nose.

What was extra fun about this craft was that my oldest decided she would make one of her own when she saw what we did; except she flipped it a little.  She used cool colors (blue, purple, green) and painted the jar blue with a layer of glitter paint(!!!).  Then she added a red and white pom-pom hat to it and called it a Christmas Peacock! :)

Monday, December 9, 2013

Hand & Foot Turkey

I had some time with my 4 year old, so we decided to make some Thanksgiving crafts to have on display when we hosted dinner.  This takes a bit depending on how long you wait to let the layers of paint dry, but turned out really cute!


Things you'll need:
 - red, orange, yellow,
   and brown paint
 - paintbrush
 - googley eyes
 - hands and feet!!


I thought it would be easiest to have the darkest color on the bottom so that it would show through the others as you put more prints on top, but you're welcome to switch it up however you would like to.  I do recommend waiting until the print is almost dry (or fully dry) before putting another print on top.  You'll see the progression photos around this post.  We tried to alternate the hands around a bit so they were not perfectly aligned.  I may actually recommend flipping the hands to the opposite side to completely get a different pattern.

After we let that dry, I coated her foot in brown paint and tried to make it so that the toes (feet) were below the hand feathers.  We added two google-y eyes after it dried and also a yellow beak.  You can add a beak cutting out a triangle from construction paper or I used the back of a paint brush to make a triangle with yellow paint.


Monday, September 9, 2013

Q-tip Tree

Here's an interesting twist on what 'tools' you can use to paint with.  I found this dot tree on Pinterest and had it saved for a future craft day.  It seemed perfect for the cooler, feeling like fall morning we had the other day.

Things you'll need:
 - q-tips
 - washable paint
 - paper
 - paint brush

Pretty simple craft this time.  All I did was paint the tree trunk and then put print-out of the image from Pinterest on the table to show Alexandria how they used the q-tips to make the leaves on the tree.  As always she had her own twist on the craft and decided that after she had made the dots that the tree needed to be enclosed with brown!  As much as my OCD makes me cringe, I love her putting her own spin on each craft we do!  Below is the original idea and then some of Alexandria's work & finished product.


Wednesday, June 6, 2012

Painting with Marshmallows

I had seen this on a pin from Pinterest and thought it would be interesting to try out.  My mom always buys the girls various marshmallows that we don't manage to actually eat much of for holidays, so it was a good way to use them up!  Alex had a great time both painting (and eating) with them!

Things you'll need:
 - marshmallows (various sizes / shapes)
 - washable paint
 - paper

 As you'll see in the picture, I picked up these neat little paint trays for $1 at ACMoore which have worked out great.  I put a bunch of different washable paints in the tray spots and then gave my daughter a hand full of marshmallows.  We had Easter flower shaped ones and the mini-ones on hand, so that's what we used.

After popping a few in her mouth, she started to use the marshmallows as stampers.  This quickly turned into more of a 'smearing' technique which you see behind her arm and eventually lead to her entire hands being covered in paint and making hand prints (we've done too many hand print crafts that she absolutely has to do hand prints whenever there is paint around).  We used tons of paper and pretty much everything turned brown since she also enjoyed dipping each marshmallow in every color before using it to paint!  I love that she just goes and runs with these activities to think of new ideas and make her own art out of them.

Here are a few pictures of some of her end result creations; the first one is what the one above ended up turning into.  What I find cute is that there are some smashed pieces of marshmallows stuck on some of the pieces of paper! :)  She enjoyed squishing the paint soaked marshmallows too, so good extra sensory learning!!

Friday, December 23, 2011

Clay Pot Christmas Tree

A friend of mine did this craft with her children and I thought it was the cutest idea to make a Christmas tree out of small clay pots, so I headed to the craft store and made my purchases.  The best part about this is that I think the biggest pot was only $1 and they went down from there, so it was really inexpensive!  These are pictures from my trial-run with Alexandria to see how it turned out and it came out so well that I bought an extra set of materials for her and Emma to make another one while we're on holiday next week.  We gave this one as a present to the woman who watches Alexandria during the day and she loved it!

Things you'll need:
 - green and red paint (with or without glitter)
 - paint brushes
 - glue or glue gun
 - bag of various sizes of glitter pom-pom balls
 - 1 big clay pot (1st level or bottom of tree)
 - 2 medium clay pots (2nd level of tree and tree stand)
 - 1 small clay pot (3rd level of tree)
 - 1 extra small clay pot (4th level or top of tree)

First things first are the clay pots.  I was afforded this being easier for me in the store since there was an example of this craft on display right with the clay pots.  All you have to do is stack them up with the various sizes to make sure everything fits just right.  They pretty much should only sit about an inch or less of overlap when you stack them up.  The one for the red base shown above should be sized so that it hits directly on the ridge of the pot that is sitting upside-down on top of it.  It didn't matter if the pots were different colors since you're painting over them anyway.  Keep in mind that the base and the second layer of the tree are the same size pot.

I had Alexandria paint all of the clay pots while they were still separate so that she wouldn't get drips of paint stuck under the ridges that would drip down and dry that way.  We only did one layer of paint (green or red depending on what pot) on each pot and then I actually used a colored glitter paint as a second coat to add some shine.  Below you can see the pot on the left that has only a layer of green paint (I used Crayola washable paint) and then next to it is another pot that has a layer of green paint and another layer of green glitter paint.  I really liked the shine that the glitter paint gave to the pots, so I'd definitely recommend using it!  I did let the pots dry for quite awhile in between coats and before I moved on to the next part.

Next was the trickiest part; stacking the pots and figuring out a way to glue them together!  I used a glue gun for this and after a bit of trial and error, I found a way that worked.  First I'd stack two of the clay pots together and see where on the inside of the one sitting on top was rubbing the other so I knew where I had to place the glue.  Then I applied a large dot (size of a dime) of glue with the hot glue gun at 4 various points around the inside of the clay pot going on top where it was going to hit pot that it was stacking on top of.  Hold the pot so that you can see the inside while you're applying the glue and then quickly flip it over onto the other pot it's stacking on top of.  Because of the large dot of glue, it doesn't dry right away and will drip down to hold the two pots together once you stack them.  Make sure to quickly make any adjustments if it's crooked or sitting odd before the glue dries!  I tried other various ways to put the glue onto the pot and try to get them to stay together and nothing else worked.  Again, I let the tree sit for awhile to make sure that the glue dried fully before moving on to the final step.

Using the glue gun, Alexandria would point to where she wanted to place a glitter pom-pom ball on the tree, I'd put a small spot of glue on the tree and she'd stick the ball to the glue.  Obviously, be very careful with this since the glue is extremely hot; you may just want to have your child point and then apply the ball yourself.

I was stumped for what to put at the top; I considered trying to find a small ornamental start to put on top, a snowflake pin, and various other ideas.  It ended up that the first place Alexandria wanted to place a pom-pom ball was smack in the middle on top!  I thought she had a great idea, so I found the largest yellow glitter pom-pom ball and we used that as the topper; worked perfectly!

We both really enjoyed making this craft and Emma is extremely excited to be making one of her own next week.  For how inexpensive this is, it would make a great long-lasting decoration or even a good Christmas gift!


Sunday, December 11, 2011

Q-tip Snowflakes!

Do you have a big box of Qtips in your house that need to be used up in places other than ears?  I ran across this craft in my Disney Family Fun magazine that I received this month and was intrigued.  In the least, it got Alexandria to use some new craft tools and items in addition to teaching me a lesson to read directions!!!

Things you'll need:
 - Q-tips
 - Glitter Glue (or regular glue and glitter separate)
 - Paper (or plastic wrap if you want to follow Disney's directions)

Using the pattern for a snowflake that you can see in the picture to the right, start in the middle by putting a big circle of glue in the middle of the paper or plastic wrap.  I chose to create my snowflake on paper because I didn't read the directions, but Disney tells you to create the snowflake on the plastic wrap.  The advantage of paper is that it's more sturdy and you can cut around the edge of the snowflakes to get rid of the extra paper around the outside; the advantage of plastic wrap is that at the end you can peel the snowflake off and easily hang/display it without any paper in between the q-tips.  To each is own...whichever you'd like to proceed with is fine.

OK, so back to the big circle of glue in the middle of whatever medium you've chosen to create your snowflake on.  I trialed a few ways to place the q-tips in the glue.  One way was just by setting them in and adding more glue on top; the other was by placing the q-tip in the glue and rolling it around so that it was then covered with glue on all sides.  I ended up sticking with the rolling method and then adding glue on top as needed when there wasn't enough coverage.  Add the q-tips to the middle placed in the appropriate direction and then continue outward with your design by adding more circles of glue at the new 'joints' or 'junctures' until you finish the pattern.

If you used regular glue, then you'll need to sprinkle the glitter on the spots where there is glue; if you used glitter glue then you're done!  I'd suggest leaving the excess glitter on the paper/plastic until it is dried and then shaking it off to put away once the design is more stable.  I added an extra line of glitter glue to both sides of all of the q-tips to add some more color to the design.

After it's dried (I'd give it overnight at least), if you used paper you can either leave it as is or trim around the edge of the snowflake with your scissors to cut it out.  I considered using a exact o-blade to cut out in the middle of the designs, but I felt it would make it too flimsy.

So there you have it, a beautiful quick and cheap snowflake decoration for the winter! 

Here's a picture of the original snowflake craft from the Disney Family Fun magazine.  They used the plastic wrap as a backing and different colors of glitter & glue to hold the q-tips together.  This would be neat to hang with string from a light or the ceiling for the holidays!

Or if you have younger children who are not quite ready to follow these types of directions, you have a beautiful glitter glue, q-tip, and glitter pom-pom piece of artwork! :)

Tuesday, December 6, 2011

Crafting with Leaves

In an attempt to integrate the multitude of fallen leaves into our crafting, I picked up a few on my way home with the girls to use in a craft.

Things you'll need:
 - Leaves (recently fallen so they won't crumble)
 - Different paint colors
 - Paintbrush(es)
 - Paper
 - Crayons
 
The first thing we tried was your typical leaf rub by placing a leaf under a piece of paper and then rubbing the side of a crayon on the paper over top of where the leaf is under the paper.  This picks up the veins and stem of the leaf showing up darker with color.  Emma had much more success with this than Alex who quickly stopped paying attention, so we moved on!

My next idea was to use the leaves as stamps.  The girls painted one side of a leaf of their choice and then pressed the painted side down onto the paper pushing with their hands on the leaf and then picking it up by the stem.  This again was much easier for Emma and she got really creative with it and made a flower out of the leaf prints which is the first picture you see in this post and below is a picture of the work in progress.
Alexandria is much more of a 'paint my hand and stamp' kind of painter with all of the hand crafts we've done, so she proceeded to move on to that while I tried to get Emma to use the leaves as paint brushes by dipping the edges into paint and then using them as a brush on the paper (below is a picture of Emma leaf painting).  Long story short, a bunch of different ideas and the best one that came out was the stamps.  All in all it was a great time with some natural items incorporated; a great way to keep using the leaves in different ways to keep your children's interest.
 ...wonder if the tongue sticking out helps? :)

Friday, October 28, 2011

Ghost Prints

Alexandria did this craft last year around Halloween at daycare, so I thought I'd recreate it since I thought it was really cute; plus this way I could see how much her foot has grown in a year!  We invited over our neighbor's son to make some ghosts too and they both had a really fun time.  This is an incredibly simple craft that takes next to no time at all.

Things you'll need:
 - Black paper (or orange also works)
 - White paint
 - Tiny google-y eyes
 - Paintbrush
 - Feet with Piggies!

As I said, it's pretty simple.  Paint your child's foot with the white paint; I think thicker you apply the paint, the better the result for this craft.  Stamp their foot on the paper wherever you'd like.  I end up cutting out around the feet so that it's smaller to display, but you could make a row of ghosts using both feet if you want to line the paper with them.  I had Alex do about 4 foot prints so that I could cut out a few of them separately to give as little Halloween mementos.  After the paint dries, add the google-y eyes to the ghost.  You can also add a comment bubble to the craft if you'd like to have it say, "BOO!" or add a little smiley face...and that's that!

I hope everyone has a safe and fun Halloween!!!

Tuesday, October 18, 2011

Hand Print Bouquet

It's unfortunately been awhile since I last did a craft OR posted a not so crafty post, however with all of the holidays coming up, I've definitely been more inspired (in addition to life slowing down just a little bit to afford me the time to even think about doing a craft).  Alexandria and I decided to make some hand print flowers and I think they turned out really cute...although they're probably better suited for spring!

Things you'll need:
 - paper
 - different colored washable paints (flower colors, green for stem/leaves, brown for pot)
 - paint brushes
 - tiny hands, of course!

Pick your colors for the hand prints and decide how many flowers you'd like to do.  Three worked out well on this size piece of paper (normal 8x11), but even one would be cute!  I didn't have much of a method to my madness about which colors should go first, but after doing it, it's easier to do the lighter colors first because the darker colors will cover them eventually if they overlap.  Proceed painting a tiny hand with the first color, make the print, wash, rinse, repeat for as many flowers as you'd like to make!

Always expect some messes!  Alexandria was absolutely thrilled with herself for accidentally getting red paint all over her belly.  As you can see, we try to save the clothing (even though the paint is washable) and we've started doing our crafts on our new coffee table (::cough::cough::) I mean the girls picnic table in the middle of our living room..

After we did the hand print flowers, I free handed the pot for the flower stems to go in.  Leave the pot and hands dry so that when you do the stems, you don't drag any wet paint around the edges of them into the stem (best way to learn is by making mistakes)!  Last thing to do is to draw in the stems and even add a leaf or two if you like.

We ended up repeating this craft with my older daughter and then sending them to a close family member as a 'Get Well' card from the girls.  Much better than flowers that you will have to throw away after a week; these will look really cute forever and are a great idea if you want to give someone something they can cherish!

Wednesday, July 27, 2011

Butterfly Tootsies

Spur of the moment distraction idea for Alexandria was to make some butterflies in the morning before heading over to Grandma's house.  This was really quick and easy; also came out rather cute!!

Things you'll need:
 - paper
 - two or more different color paints
 - black marker
 - brush or anything to apply paint to feet!
 - tiny feet & fingerprints

First things first, grab a foot and paint the bottom.  You could get creative with this step and paint it various different colors so that the butterfly's wings are more colorful, but for today I stuck with a solid color.  Apply paint and stamp on the paper so that the footprints are on the opposite side than where they normally would be.  Wash, dry, repeat with opposite foot!  A trick I use is to always have Alexandria stand on the non-painted foot while I hold the foot with paint up in the air.  That way she has her weight on the other foot and I can more easily place the painted one onto the paper.

Final paint step (yes, I said this was easy!) is to grab a finger or two, dip them in paint and then have them create prints up the middle to make the butterfly's body.  A thumbprint works great for the head or you can just paint a larger circle with a finger like we did.

Wait for the paint to dry and then you can add the finishing touches.  Two dots for the eyes, a little smile and two antennae!  Quick, but cute butterfly memories!