Showing posts with label thanksgiving. Show all posts

Monday, January 27, 2014

Baby Food Turkey

Since I had a LOT of baby food jars coming in and out of my house, I was looking for a craft to keep the girls occupied over Thanksgiving and for a cute centerpiece for our table.  We ended up making a handprint turkey and I think it turned out really cute!

Things You'll Need:
 - Construction paper, pencil, & scissors
 - Baby Food Jar (washed and label removed)
 - Brown paint & a paint brush
 - Google-y eyes
 - Hands to trace

First we put the first coat of brown paint on the baby food jar.  No need to paint the 'top' of the jar since you'll never see it.  We did this and then let it dry while we made the hand prints.  I'd suggest a second coat so it has good coverage.

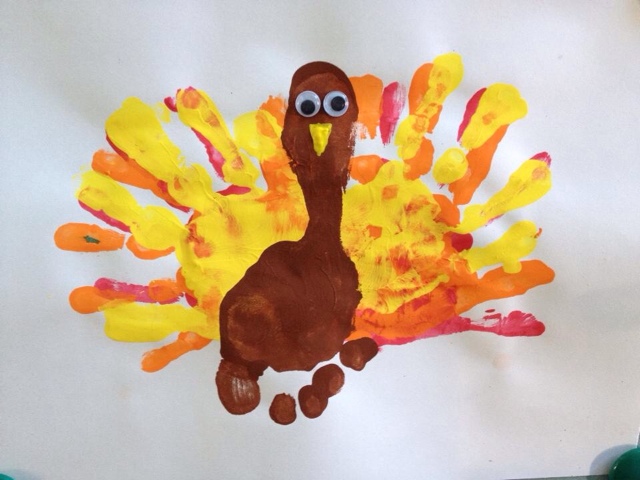
While waiting for it to dry, we traced my daughters hand on yellow, red, and orange construction paper.  Cut them out and then you can either tape, glue, or hot glue them together to create a fan look for tail feathers.  I found it worked well to flip the hands on either side so that the thumbs were at the bottom and you just sort of move the layers around so you can see all of the colors.  One thing to note is to make sure that the bottom goes straight across (don't angle so much that the thumbs are pointing down) or you will have problems with them bending or getting squashed when you put them on the jar. 

Once the jar is dried, you can glue the hand 'feathers' to the back of the jar and let it dry.  Next you can add the two google-y eyes and we just cut a small yellow triangle from the yellow construction paper for a nose.

What was extra fun about this craft was that my oldest decided she would make one of her own when she saw what we did; except she flipped it a little.  She used cool colors (blue, purple, green) and painted the jar blue with a layer of glitter paint(!!!).  Then she added a red and white pom-pom hat to it and called it a Christmas Peacock! :)

Monday, December 9, 2013

Hand & Foot Turkey

I had some time with my 4 year old, so we decided to make some Thanksgiving crafts to have on display when we hosted dinner.  This takes a bit depending on how long you wait to let the layers of paint dry, but turned out really cute!


Things you'll need:
 - red, orange, yellow,
   and brown paint
 - paintbrush
 - googley eyes
 - hands and feet!!


I thought it would be easiest to have the darkest color on the bottom so that it would show through the others as you put more prints on top, but you're welcome to switch it up however you would like to.  I do recommend waiting until the print is almost dry (or fully dry) before putting another print on top.  You'll see the progression photos around this post.  We tried to alternate the hands around a bit so they were not perfectly aligned.  I may actually recommend flipping the hands to the opposite side to completely get a different pattern.

After we let that dry, I coated her foot in brown paint and tried to make it so that the toes (feet) were below the hand feathers.  We added two google-y eyes after it dried and also a yellow beak.  You can add a beak cutting out a triangle from construction paper or I used the back of a paint brush to make a triangle with yellow paint.


Saturday, November 20, 2010

Fall Bumpkins

Recently my girls and I went to a pottery painting store to make some Christmas/Birthday presents for Daddy.  While browsing the store's website to get some ideas before going (since I'm not so crafty!), I came across a plate with a pumpkin on it...a 'bum'pkin!!!  Now I thought this was beyond adorable and something I had to do (just not in public in the middle of a store)...and so it became our at home project.

Things you'll need:
- orange and green washable paint
- paint brush
- paper plate (unless your child will stay put long enough to paint their bum!)
- whatever you'd like to put the bum on - we used white construction paper
- a paint proof location and a tiny bum :)

First I poured some paint onto the paper plate and spread it around.  Unfortunately you can't tell in the picture how quickly I had to do this while Alexandria started unrolling the toilet paper!

Then I put the paper plate with paint on the floor next to 3 pieces of paper.  I'm not sure there's an 'art form' to getting this accomplished, but I sat her bum on the paper plate and smushed her down a bit.  After that I picked her up and plopped her back on the floor on top of a piece of paper.  You'll see in the pictures that the bottom of the bumpkin (near her legs) isn't quite as round it probably should have been.  My only resolution to this would be to hold your child between your arms with their legs up and get only bums to stamp on the paper.


Next we cleaned up because I'm not sure anyone wants their child running around with a wet paint orange bum while you're trying to draw on the stem!  The stem was simple; just a quick brush stroke and you're done.  BUMpkins!!!